
But why?
Hey guys, this is the first project on my new website! I’m going to be documenting the construction and design of the needle cutter I’m building.
What is a needle cutter, and why?
A needle cutter is a device very similar to a CNC machine or a laser engraver- in fact, it uses the same style of movement platform. However, instead of a laser or spinning bit, this cutter uses a needle on a piston that spins a motor to make 10-15 holes per millimeter in the material. Here’s a picture to demonstrate:
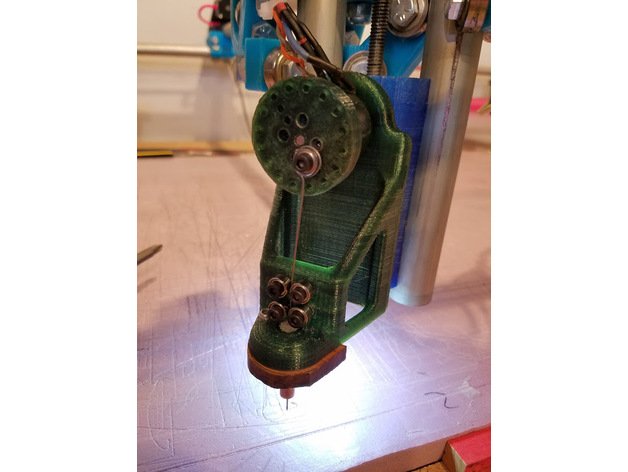
You may see the brushless motor hidden behind a flywheel (top). A piece of music wire is connected to the bearing to form a piston. On the bottom there’s a cooling block that isolates a guide for the needle.
Image: Jhitesma on Thingiverse.
thing: 2450613
Why do I need one? Well, a few reasons. Mainly I just need something to help me cut out FliteTest foam plans. Right now I have to print out 10-30 pages of plans, trim the edges off, align and tape them to the paper, and finally cut them out (usually messing up something else in the process).
But why a needle cutter over a CNC router or laser cutter?
Simple; it’s perfect for cutting foam board.
CNC routers are noisy, generate lots of dust, leave rough edges with wide cuts, and require copious bracing and support on the structure. Plus they’re kind of overkill for my purposes.
Laser cutters are expensive, a little dangerous, and require an enclosure and ventilation system to get rid of the toxic gasses that apparently come from burning foam.
A needle cutter, on the other hand, is relatively quiet, doesn’t require a particularly sturdy structure or enclosure, doesn’t make much dust, and leaves smooth, clean cuts.
Any disadvantages?
As with everything, there are a few. One drawback is the lack of support. Since this is an extremely recent innovation, and only a handful of people have built them. this means that beyond a video or two, you pretty much have to rely on CNC information and components. I can definitely see this changing in the future though!
That’s all for this post! In the next one we’ll look at some of the parts I’ve collected for the project and some design goals.
Thanks for reading!
Nico